Configuring Microsoft O365 with Sorb SCES
What Is Office 365?
Office 365 is the brand name that Microsoft uses for a group of software and services subscriptions, which together provide productivity software and related services to their subscribers.
For business users, Office 365 offers service plans providing e-mail and social networking services through hosted versions of Exchange Server, Skype for Business Server, SharePoint and Office Online, and integration with Yammer, as well as access to the Microsoft Office software.
Configuring MX to Sorb SCES
Sorb SCES IP could be found on Connection Details.
Configuring Microsoft 365 with Sorb SCES using Connectors
Option B: Configuring Microsoft 365 with Sorb SCES by M365 Connectors
Bypass Spam Filtering Rule
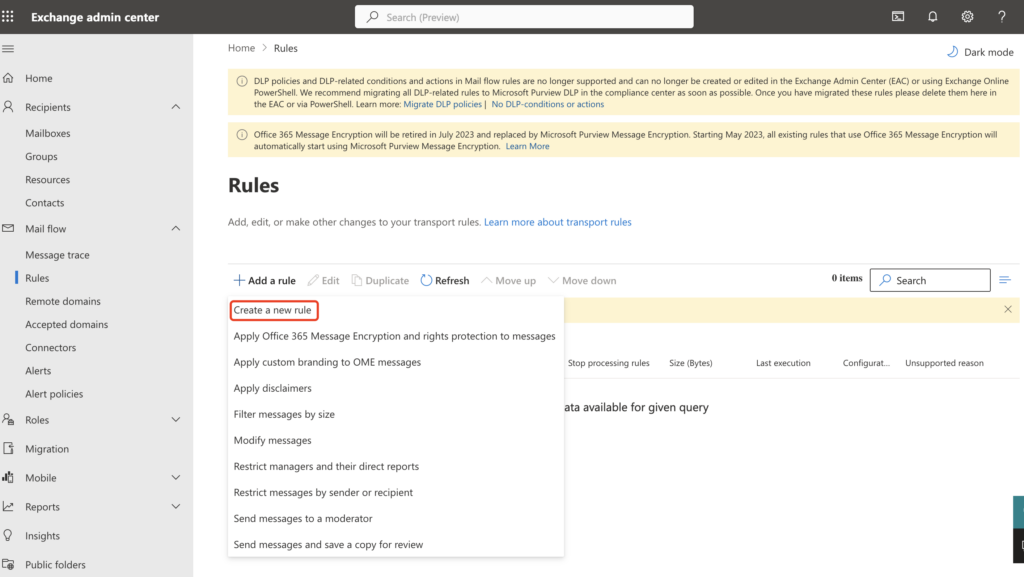
- Log-in to the Microsoft 365 Admin Center (https://portal.microsoft.com)
- In the left-hand menu, expand Admin Centers
- Click Exchange
- From the left-hand menu, navigate to Mail flow > Rules
- Click [+] to create a new rule
- Select Create a new rule… in the drop-down list
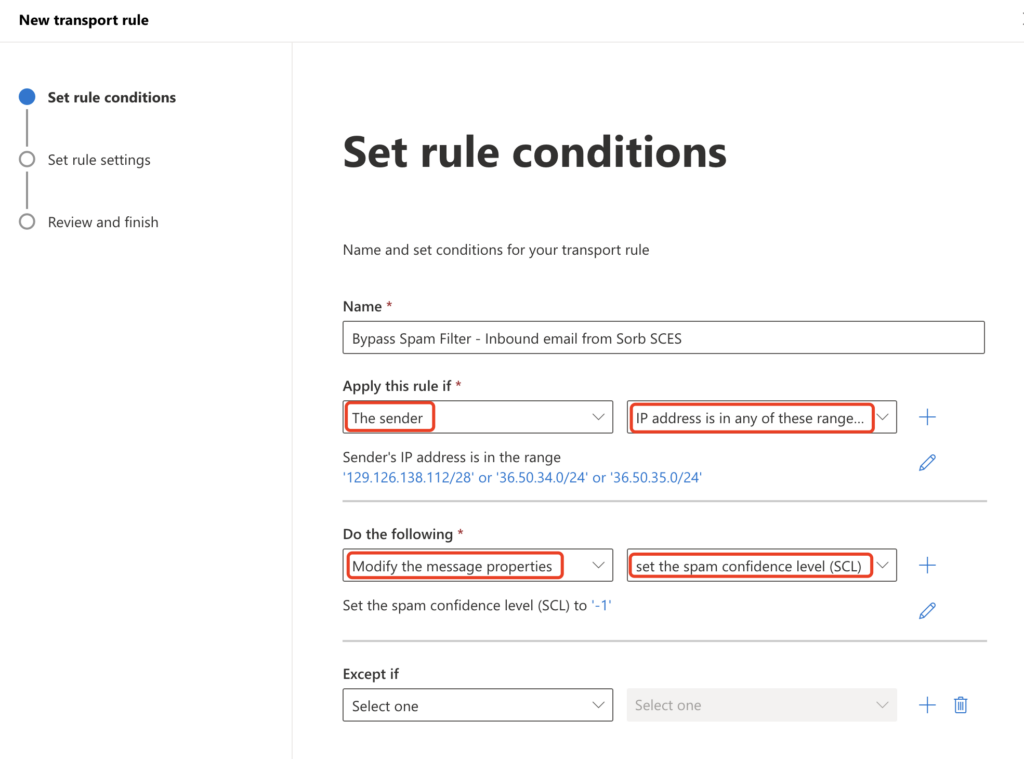
- Enter in a name for your new rule: Bypass Spam Filter – Inbound email from Sorb SCES
- For “*Apply this rule if…”, select: The sender – IP address is in any of these ranges or exactly matches
- For the “specify IP address ranges” pop-up, add the IP addresses that are indicated in Connection Details under IP addresses
- Click OK
- For “*Do the following…”, the new rule has pre-selected: Set the spam confidence level (SCL) to… – Bypass spam filtering
- Click Save
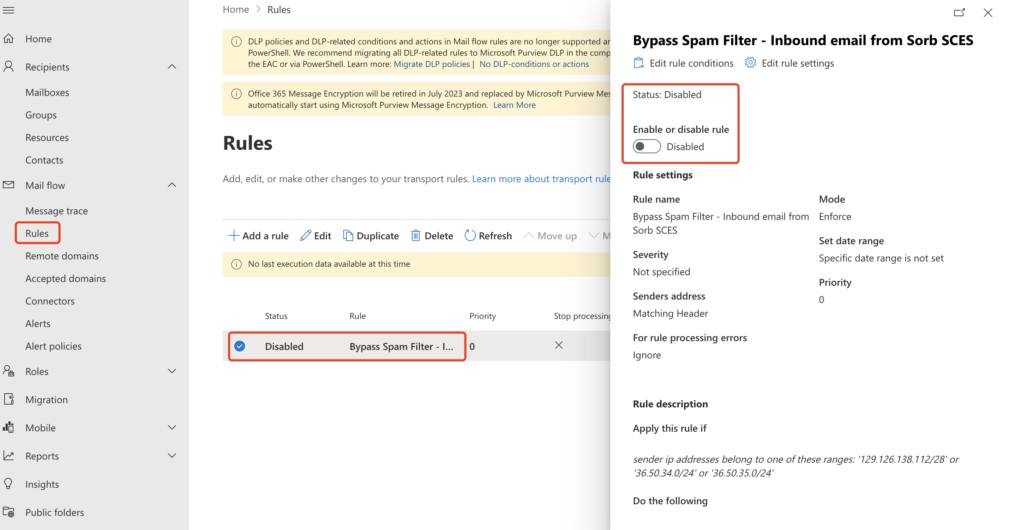
- Click the newly created Rule which is Disabled, then switch it to Enabled.
Your bypass spam filtering rule should look similar to the following:
Moving the detected emails to Junk Folder – Optional for MARK Customers ONLY
Requirement for configuring following the O365 mail flow rule on Sorb SCES

- From the left-hand menu, navigate to Mail flow > Rules
- Click [+] to create a new rule
- Select Create a new rule in the drop-down list
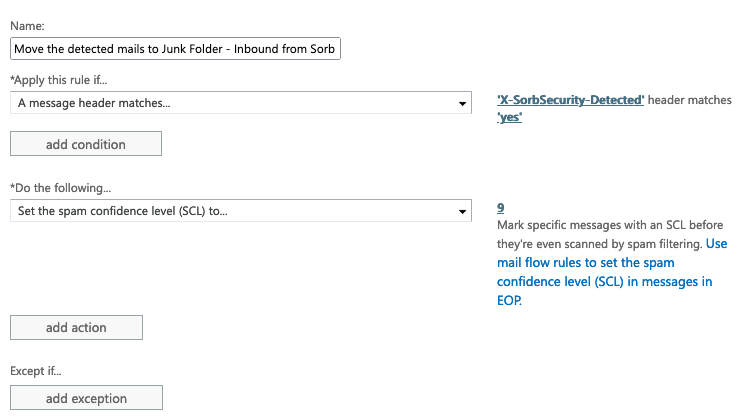
- Enter in a name for your new rule: Move the detected mails to Junk Folder – Inbound from Sorb SCES
- Click More options
- For “Apply this rule if…“, choose “A message header…”, then matches these text patterns. On the right side of the windows, click “Enter text…“, fill in “X-SorbSecurity-Detected” as an example. Then click “Enter text patterns…“, fill in “yes“, click + icon. as an example.
- For “*Do the following…”, choose Modify the message properties…, then Set the spam confidence level (SCL) to… 9
- Click Save
Your Junk Folder rule should look similar to the following:
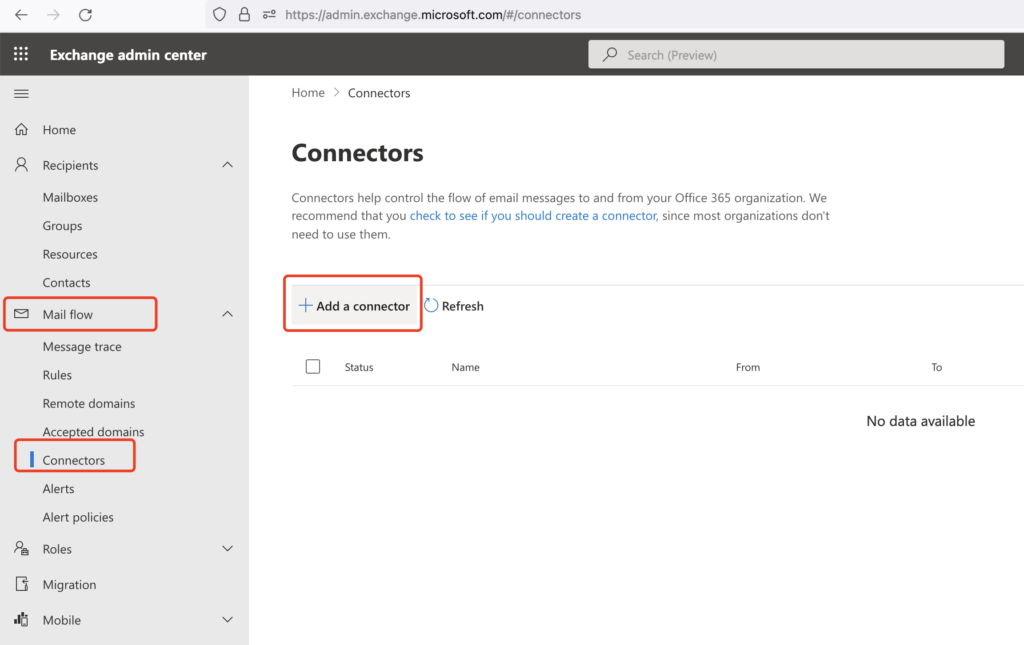
Receiving Connector
- Remain in the Exchange Admin Center
- From the left-hand menu, navigate to Mail flow > Connectors
- Click [+] to create a new connector
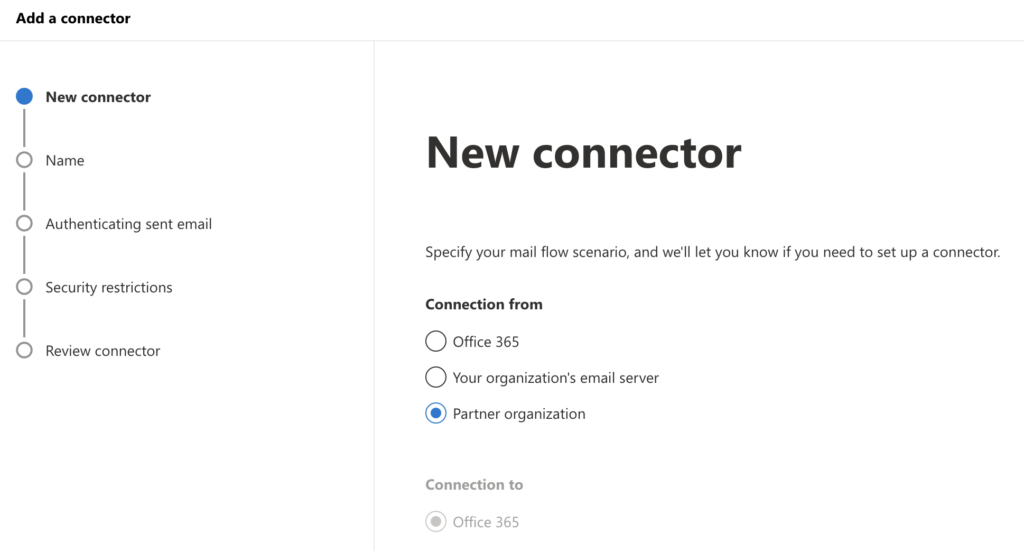
- In the “Select your mail flow scenario” pop-up window, choose the following:
- From: Partner organization
- To: Office365
- Click Next
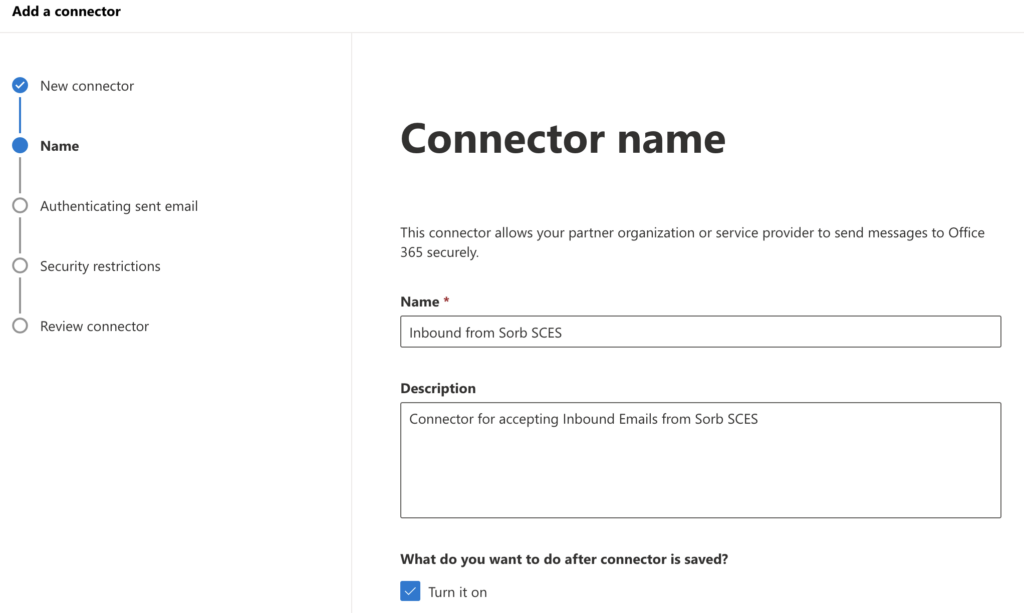
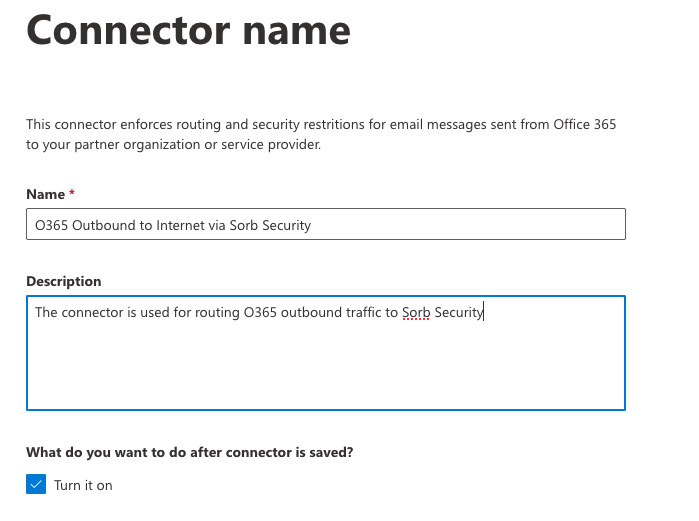
- Enter in a name for your new connector: Inbound from Sorb SCES
- Enter a description, if you wish
- Click Next
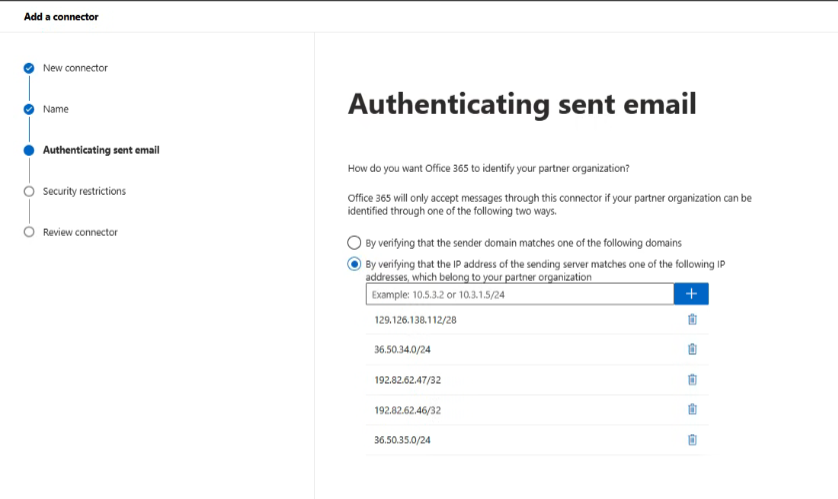
- Click Use the sender’s IP address
- Click Next
- Click [+] and enter the IP addresses from Connection Details under IP Addresses
- Click Next
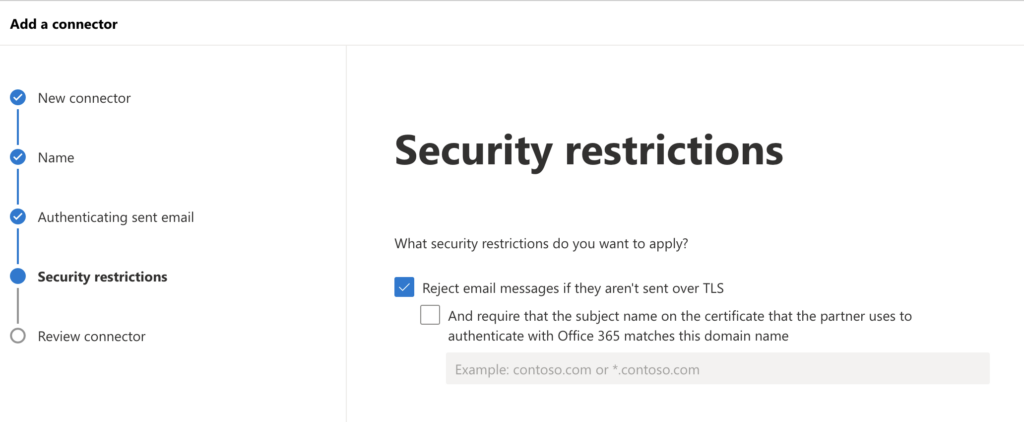
- Select Reject email messages if they aren’t sent over TLS
- Click Next
- Click Save
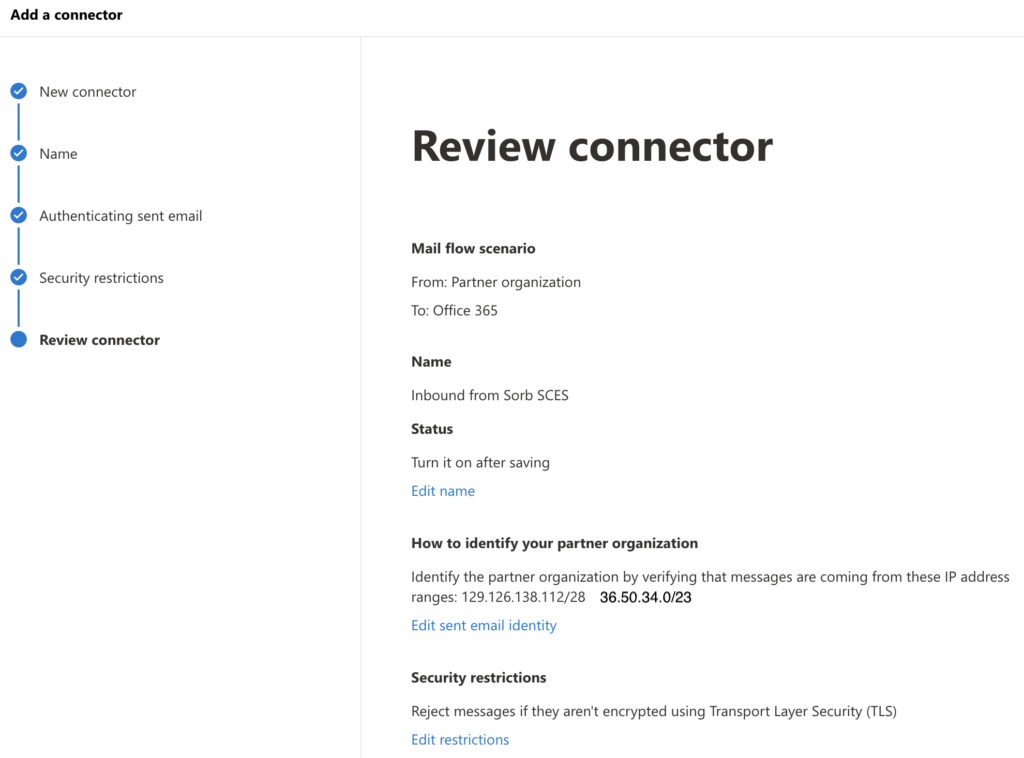
Your new connector should look similar to the following:
Configure “Connection filter policy” under Microsoft 365 Defender
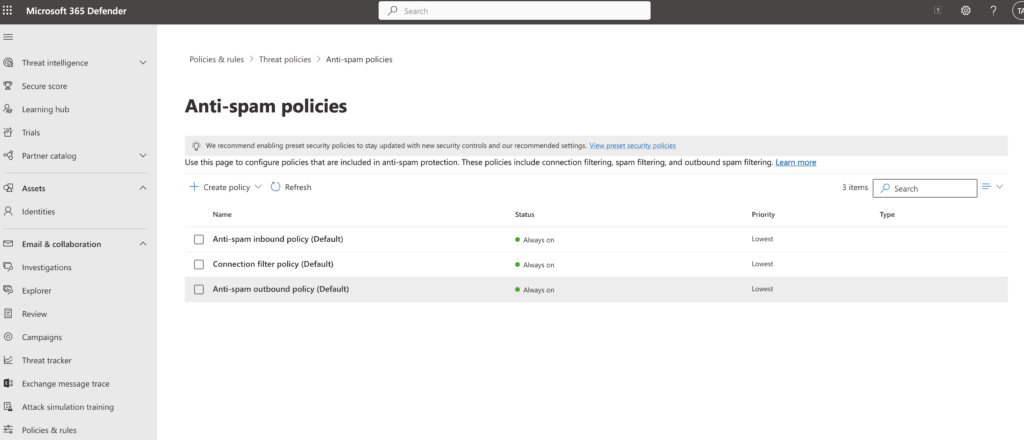
1. In the Microsoft 365 Defender portal at https://security.microsoft.com, go to Email & Collaboration > Policies & Rules > Threat policies > Anti-spam in the Policies section. Or, to go directly to the Anti-spam policies page, use https://security.microsoft.com/antispam
2. On the Anti-spam policies page, select Connection filter policy (Default) from the list by clicking anywhere in the row other than the check box next to the name with the IP / IP range from https://doc.sorbsecurity.com/sorbsecurity-cloud-connection-details/
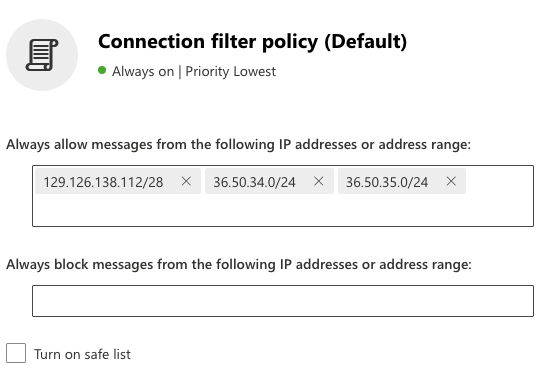
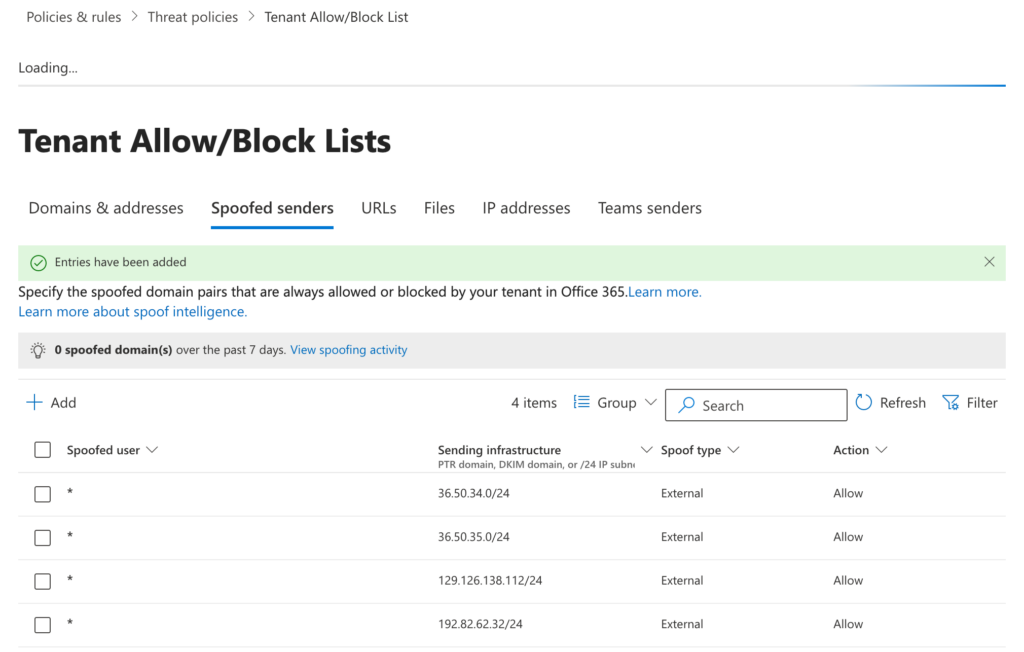
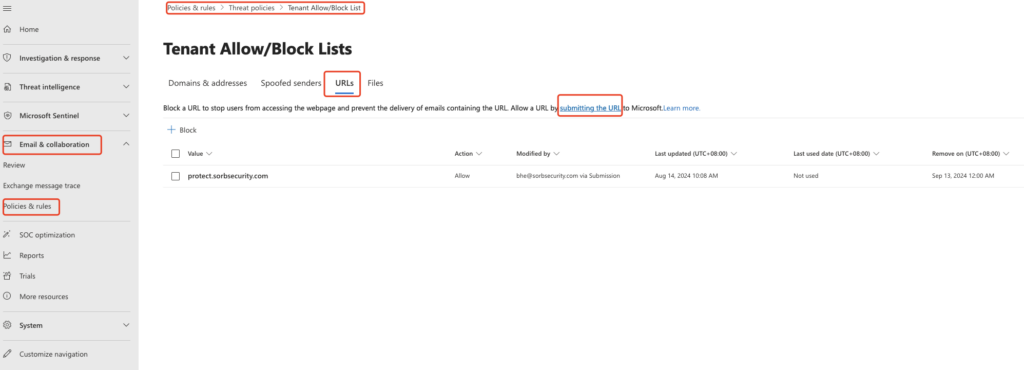
Note: M365 does not support /23 that you have to break the subnet into 2 records as above.Configure “Tenant Allow/Block Lists” under Microsoft 365 Defender
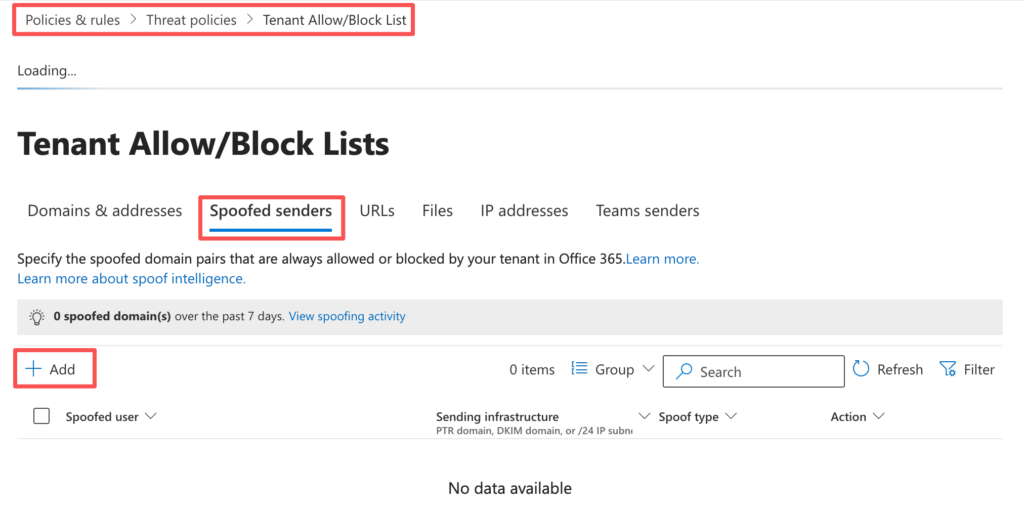
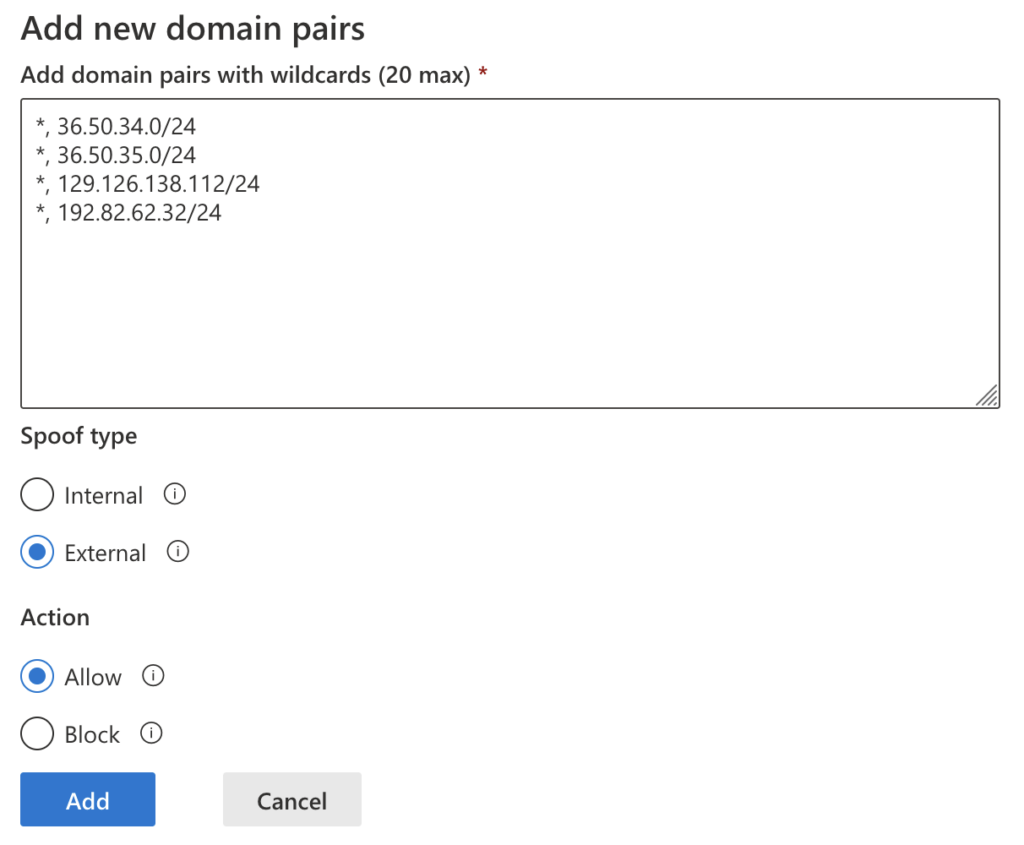
The configuration shall look like this,
Configure Outbound Routing
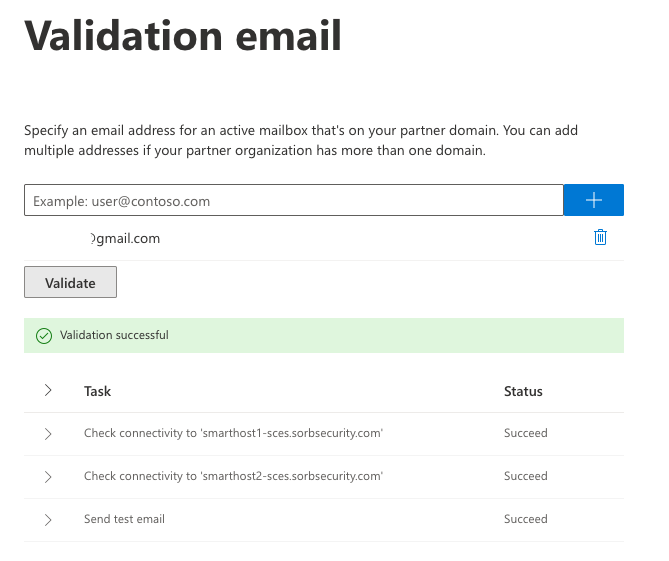
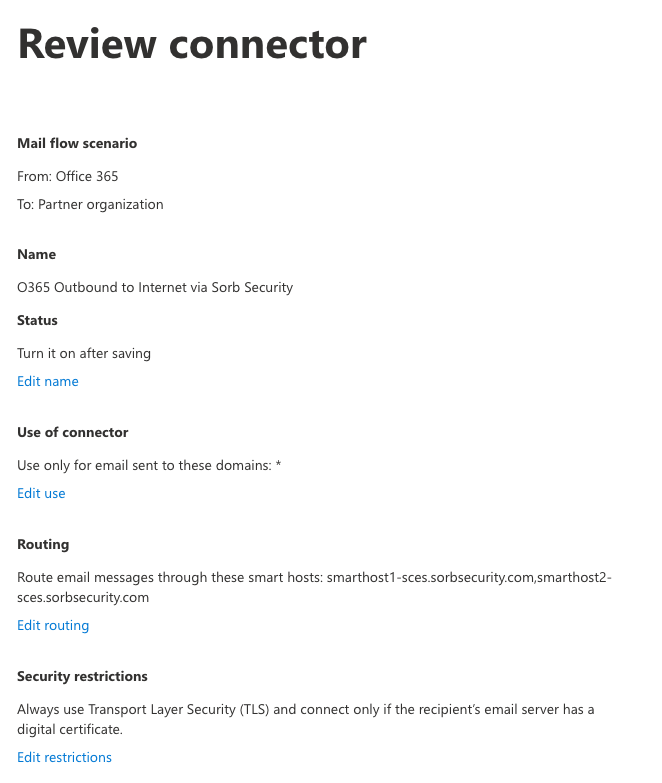
1. Log into the DNS Admin Console to update SPF record from here
v=spf1 include:spf.sorbsecurity.com include:spf.protection.outlook.com ~all2. Log in to the Sorb Admin Console, https://admin.sorbsecurity.com
3. Navigate to Mail Routing | Outbound. Follow the SPF record “spf.protection.outlook.com” to add the ip4 subnets to Outbound Mail Source
40.92.0.0/15
40.95.0.0/16
40.107.0.0/16
52.100.0.0/14
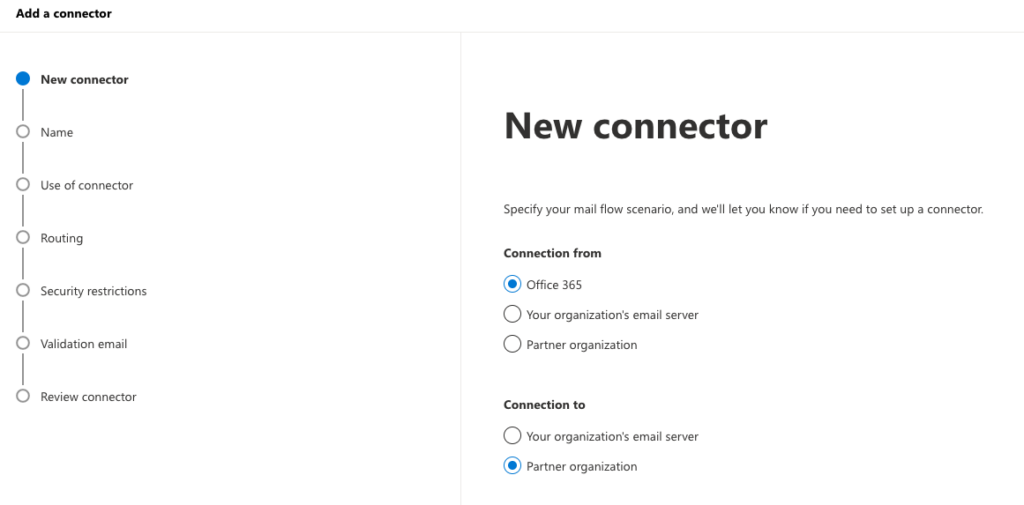
104.47.0.0/174. Log in to the Microsoft 365 Exchange Console, https://admin.exchange.microsoft.com
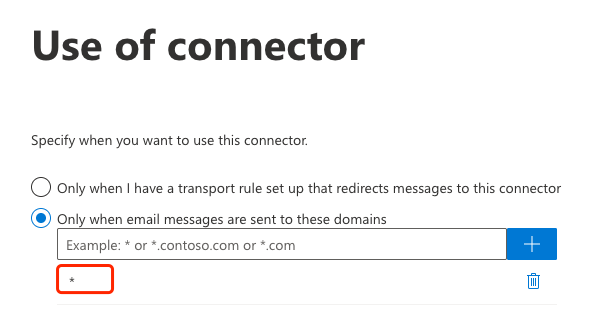
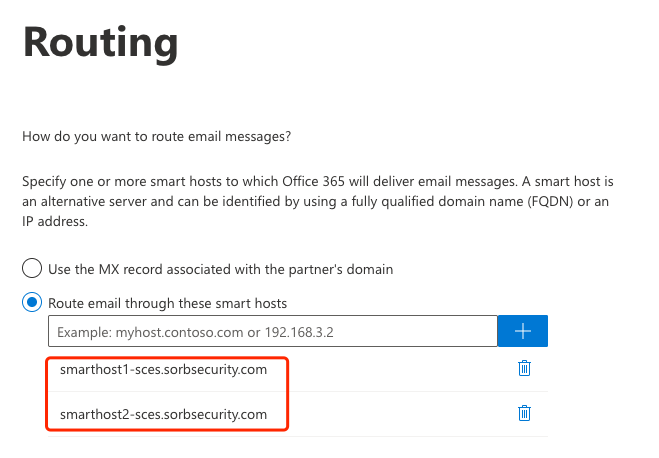
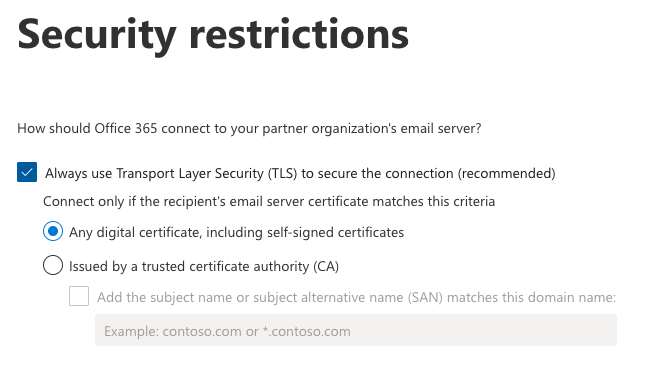
5. Navigate to Mail Flow | Connectors, Click “Add a Connector”. Configure the new connector as the figures
Bypass Anti-Phishing Feature on M365(Optional & Suggested)
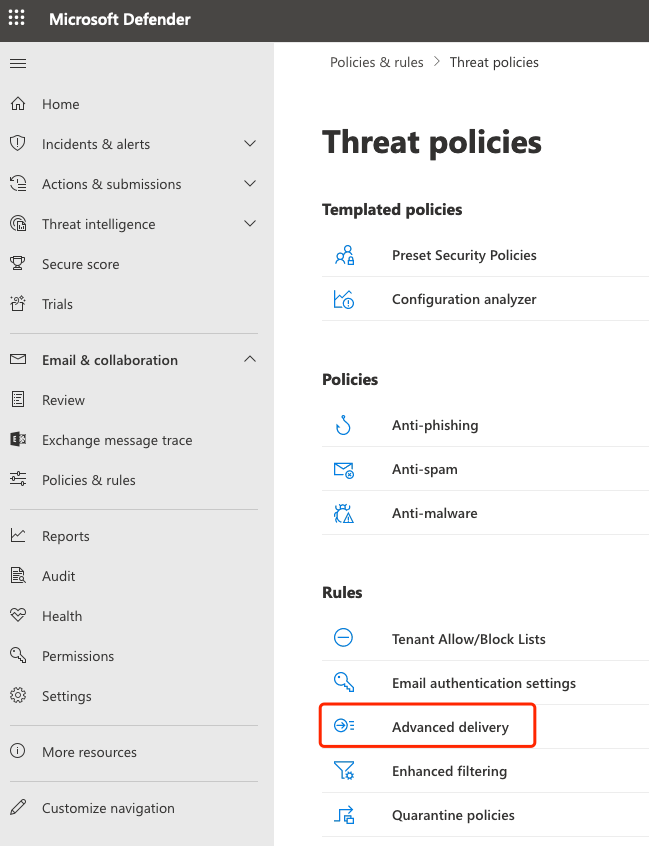
1. Go to Security on M365, then choose Policies & Rules -> Threat Policies.
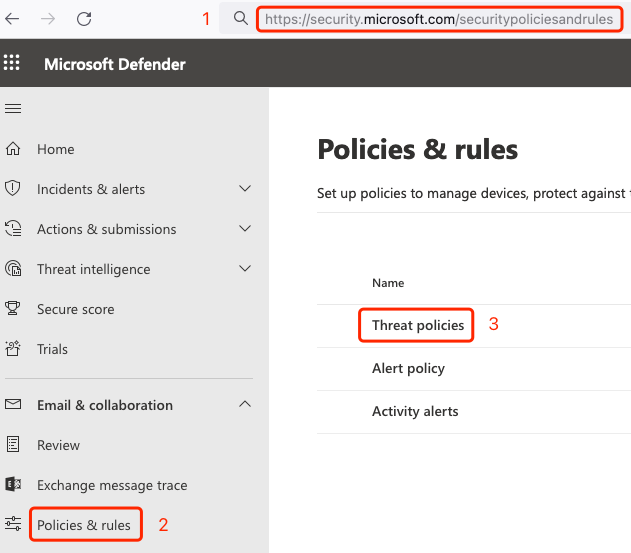
2. Navigate to Advanced devliery, then choose Phishing Simulation tab, click Edit
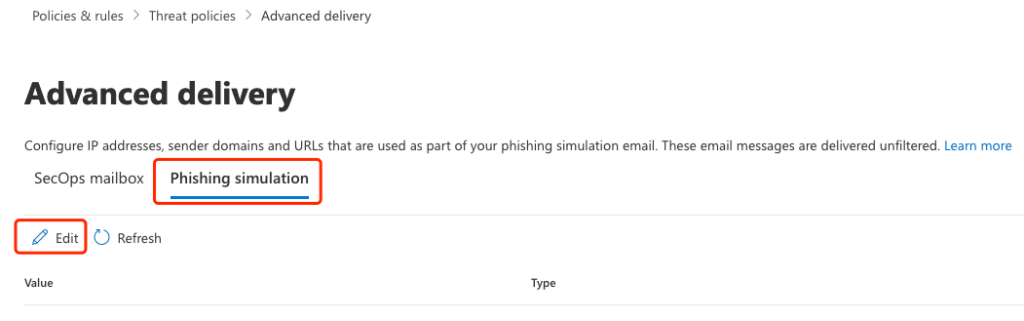
3. Find Sending IP and click the arrow to expand the input form. Then fill up the IP and save.
4. Configure Tenant Allow/Block Lists to allow URL “protect.sorbsecurity.com” by clicking “submitting the URL” in the Microsoft Defender portal at https://security.microsoft.com, go to Email & Collaboration > Policies & Rules > Threat policies. Or, directly access https://security.microsoft.com/reportsubmission?viewid=url&new=%7B%22type%22%3A2%2C%22reason%22%3A2%7D


Note: You can download the powershell script to configure M365. Highly suggest to follow the steps above, powershell does not consider the priority of the rules and connectors. Click DOWNLOAD